Showing posts with label kids. Show all posts

Wednesday, July 9, 2008

Playing Dress Up

It figures. I say I'm going on hiatus and then the next day I get brilliant idea for a post. I thought I'd write about playing dress up as it has been a favorite hobby of mine for as long as I can remember. When I was little, my mother created dress-up trunks for my sister, my brother , and myself. These were old, large trunks filled with old Halloween costumes, old prom dresses and garage sale finds. So when playing pretend or putting on plays, my siblings and I always did it in costume.

So it follows, when I had a daughter of my own it seemed only natural for her to have her own dress up trunk. Hers if filled with many more store bought costumes than mine was. My mom caught a sale at the Disney store, so she has every princess costume there is, complete with some very nice wigs. I also discovered that you can get Halloween costumes dirt cheap if you buy them a few days before or a few days after Halloween. Originally, I used a small trunk I bought on sale at Hobby Lobby, but it got a bit beat up. On a recent trip to Ikea, I came across these. They are made out of fabric and Velcro and work a lot better than the wooden trunk I had before.

So yesterday was a rainy day, which made it a perfect day for a fashion show. Here are some pics:


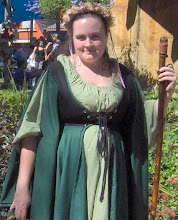
Of course, as from the first picture, you can see I've never really grown out of dress up either. After all, I can't think of a better escape from the mundane than putting on a fabulous outfit. And the great thing is, there are all kind of excuses now for adults to play dress up. My favorites are Renaissance Fairs and Conventions. There also event like the Labyrinth of Jareth. I've never attended but have heard it is amazing from those who have. Recently, I came across a great blog, called Your Fantasy Costume. It's definitely one to watch if you like fantasy costumes.
However, sometimes its fun to do to a mini-dress up with your everyday clothes. I've been known to wear this top and vest with jeans. If your looking for "fantasy" style clothes that you can blend with everyday where, try The Pyramid Collection, Hot Topic, or if you're little on the curvier side, there's my favorite store Torrid.

Tuesday, July 1, 2008

Letters to the Fairies, a variation


If you've read the Fairy mailbox post, but find yourself lacking a place to put such a thing, don't despair. My daughter has come up with an interesting way to write to the fairies and all it requires is a sidewalk and some sidewalk chalk.

Sidewalk chalk is fun, even when you aren't writing to the fairies. For a little extra decoration at your next door party, use the chalk to draw pretty swirls, flowers, or vines on a sidewalk or patio.

Wednesday, June 25, 2008

Book Review: Tiny Treats


A few weeks ago, to celebrate the end of school, the fairies brought my daughter the book Tiny Treats by Julia A. Monroe. The books shows how to make tiny, fairy-sized, edible food from other foods. This books is great if you are going to put on a fairy picnic or tea. The food is just the right size for our fae friends, as well as yummy (for the most part) for our human ones.

The book is listed at 8+, but my six year old daughter seemed to be able to do most of the recipes we tried with just a little help. The food is adorable and for the most part very easy to make. I will admit some of the combinations sound less than appetizing (in particular the sandals made from Nutter Butters and Fruit Roll-Ups). But of everything we tried, we liked.

My only other complaint is that some of the instructions are little vague or could be improved upon in small ways. For instance, we made the tiny watermelons on pg 19. The instructions tell you to put the lime halves your using as the outside of the watermelon into a muffin tin so they don't roll around. Well, they still roll around. I found that if I cushion them with paper towels first, it makes it easier to fill them with watermelon jello insides as well as move them to the fridge to set.

We also tried the sub sandwiches on pg 18. However, I couldn't find the breadsticks they suggest, so we used small dinner rolls instead. Also, my daughter is not a fan of pepperoni, tomato, or onions. So, we used her favorite sandwich stuffs instead, cutting down pieces of chicken and ham to fit on our tiny buns.

A friend of mine tried the Jelly Roll on pg 30 and said that is a great and easy snack that kids can make themselves. My daughter and I also tried the perfume bottles on pg 41. This is a great recipe for younger kids if you just use slightly larger candies. In my daughters case, I used Jolly Ranchers (though be careful, some stand upright better than others).

We also made the hats on the same page. These are lots of fun to decorate. My only advice is that if you want to cover the tops with Fruit Roll-Ups that you do that before you frosting the tops to the bottoms.

However, my favorite recipe in the entire book is the tiny cakes on pg 34-35. They are so very simple to make--just two sandwich cookies frosted together, then covered in frosting. And like the hats, they are lots of fun to decorate. More over, I can see lots of uses for these beyond fairy picnics. They would make great treats for school or favors for a party. And the little wedding cake that's made the same way on pgs 36-37 would be adorable at a shower or even at a wedding.

Overall, I thought this was a great book for kids and adults alike. While the instructions could be more detailed, the pictures are great. And the food is fun.

The book is available through the American Girl website or in local book retailers.

Tuesday, June 24, 2008

Kids Project: Fairy Mailbox.


If you have young children (or even older ones) who believe in fairies, this is a fun, ongoing project you can do with them. A fairy mailbox is a special mailbox that kids can use to write the fairies and receive messages from them.

The idea originally comes from Cultivating Sacred Space by Elizabeth Murray. In the chapter on her own garden, she mentions a knotty hole in one of her trees that the neighborhood children use as a fairy mailbox to send letters and small gifts to the fairies (as well as receive them, sometimes). So when I moved into the enchanted cottage, there was an old mailbox in the backyard that my mother had put there as a birdhouse. A light bulb clicked and I knew it would make a perfect fairy mailbox for my own daughter. She loves it and checks it everyday in case the fairies have sent her something.

For ages 2 and up, with adult participation.

What you'll need:

Old metal mailbox, or other weather-proof paintable container
Primer for metal (or whatever material your mailbox is made out of)
Paint, various colors
weather-proof varnish
various ribbons and lace
bells or wind chime
paper
metallic ink pens (available from scrap booking supply stores)
fairy treats (see instructions)

Prime the mailbox for painting. Explain what a fairy mailbox is to your little one. Then, together, paint the mailbox however you want. You can paint flowers, fairies, animals, plants, stars, hearts---whatever motif you think the local fairies will like. And you can use whatever method you like best. In my daughters case, we used sponge shapes she got in a painting kit to put flowers and birds all over the box. However, you could use stencils or decals or just freehand designs. Afterwards, cover the box with the varnish to preserve you paint job. Tie the ribbons and lace on the handle of the mailbox to create a decorative pull to help the fairies (and your little ones) open it.

Next, find a spot outside where you can mount the mailbox so the fairies can find it. An old tree trunk works well, or you can use a post. In our case, the box was already mounted on a pole outside so we painted the post as well. Hang the bells or wind chimes nearby. The fairies will like to fly by the box a lot and that way you'll be able to hear them.

For letters from the fairies, use paper that has the edges artfully torn. You can use ordinary computer paper, just carefully tear off the edges to make the paper seem more rough. Write the letters addressed to your child (or children) with the metallic ink pens. If you can, use a fancy script print (or cursive if you child can read it). Write about the things going on in your child's life (latest trip to Grandma's, school activity, favorite toys, etc). As an extra touch, use the pen to add glitter trails (make * all over) or tiny fairy footprints. Originally, I signed these letters "the fairies" but my daughter began to ask what the fairies' names were. So now they are signed with a fairy name (such Daisy Starshine) and the rest of the fairies. The fairies also like to leave presents, usually in the form of a small piece of candy, stickers, or some other small trinket. On special occasions such as birthdays, they like to leave something bigger.

Encourage you child(ren) to correspond with the fairies. Younger children can draw pictures and older ones can write notes (great writing practice by the way). And they can leave presents for the fairies too, such as flowers, leaves, shells, or pretty stones.